Gypsum board installation: how to do ? In this post, we will explain the 7 steps you must take to install your own gypsum board successfully.
Use Of Gypsum Board In Construction
Gypsum board is a building material frequently used in construction works such as ceilings, suspended ceilings, false ceilings and partition walls. It is covered with cardboard on both sides and the center is made of gypsum material. Due to its decorative appearance, it has a wide usage area from houses, workplaces, studios where sound insulation is required, cinema halls to large shopping centers where lighting will be made.
Partition walls are often preferred in homes and offices where additional rooms are required.
According to the properties of gypsum mortar, there are water and fire resistant and soundproof plasterboard. Discover our related post about the different types of gypsum board !
Drywall Suspended Ceiling
During spot application to the ceiling or walls, the electrical installation can be switched off by means of drywall. It is also preferred to provide heat insulation and heat saving in loft houses. Your ceiling does not need to have any features to make plasterboard. It can be applied to all kinds of wood, concrete or metal surfaces.
Drywall Wall Partition
Gypsum boards are mounted on the metal frame, allowing you to have new walls that are not carried but carry all the other features of a wall. It is durable and you can paint or tile on it. It provides heat and sound insulation. In this way, it is possible to divide a large room into two. It can be used to create rooms in offices or to divide the large hall into two and get an additional room.
Gypsum Board Is Durable Against Earthquake
Gypsum board is not a wall carrier, therefore it cannot make your house more resistant to earthquakes so do not play with the foundation of your home. However, during the earthquake there is no cracking. Given that gypsum board structure is light, the risk of life-threatening is very low.
Gypsum Board Installation
Before starting your gypsum board installation, make sure to prepare the materials  you will have to need and work with:
- Gypsum board
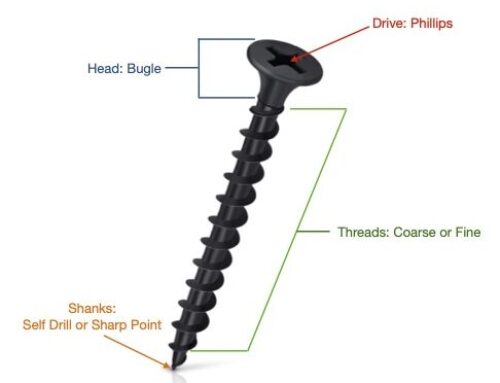
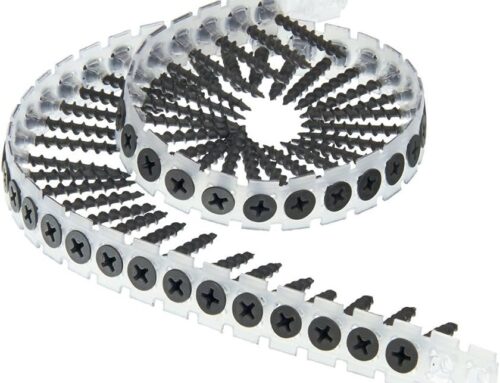
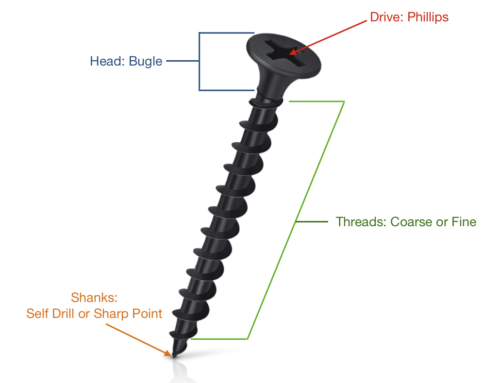
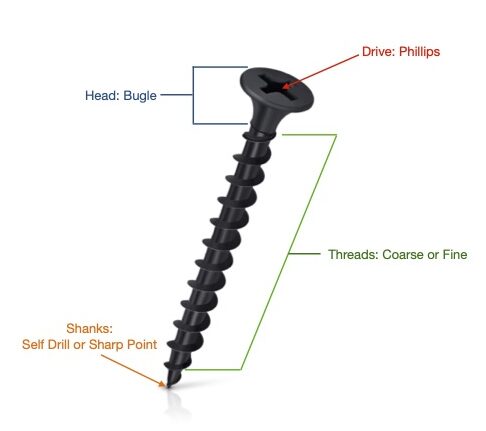
- Screws
- Dowels
- Washers
- Drill
- Metal profiles U and C
- Trimming-knife
- T-square
- An adhesive applicator
- A measuring tape
- A pencil
- A hammer
- Sound insulation tapes
Step 1: Wall Control
The position and safety of the cladding wall is determined. The line on which the U profiles have to be fixed is marked with a pencil. The mark on the floor is carried to the ceiling with the help of plumb and drawn to the ceiling with the help of the painted twine rope.
Step 2: Preparation Of Metal Profiles
The length of the cladding wall is determined with a measuring-tape and the U profiles are cut according to this length. C profiles are cut short 1 cm at ceiling height for ease of installation. When the C profiles are cut to their full extent, even the smallest possible errors during assembly can result in very great results during installation. Sound insulation tapes are placed under the profiles before the profiles are fixed. The number of C profiles is calculated by accepting the axle spacing of the profiles to 60 cm. For wet volume wall applications, axle spacing should be 40 cm.
Step 3: Fixing U-Profiles
U-profiles are mounted to the floor and ceiling with the help of dowels + screws + washers using a drill.
Read our related post to discover more about our metal profiles !
Step 4: Fixing The Staples
The appropriate staples selected according to the distance between the cladding wall and the building wall are fixed to the wall using dowels and screws.
Step 5: Installation Works And Insulation
Electrical wiring and plumbing should be done before placing the panels. For instance, in order to hide the maintenance of your plumbing or electrical system, you can use an access panel system.
Step 6: Plasterboard Screwing
Fixing the gypsum boards is done to the U and C profiles along the edges of the gypsum board with the screws using a drill or hammer. When screwing, make sure that the screw gaps are not more than 30 cm and that the screws are screwed off properly. When screwing, the screws should not be closer than 1 cm to the edges of the gypsum board.
Step 7: Coating and Finishing Surface
You need to patch holes or fill cracks in the corner. For easier and cleaner finishing surface, you can use the all purpose ready mix joint compound for instance. After the first drying, a second layer of joint compound must be necessary. Also, note that, depending on temperature and humidity, the drying time can vary between 12 and 24 hours. To finish, Then, you can start to paint your gypsum board.
Good luck and show us your work by tagging @boardandwall !
Gypsum Board Installation Tips
Interested by knowing how to install a plasterboard wall ? Find out more in this video !
